Getting Started with Notebook Pro
Creating Your First Notebook
A Notebook is just like your real Notebook. It is one place you can keep your drawing, writings, ideas, doodles, images, photos and more. Save all you creations on pages and images. Keep them organized in the different sections of your Notebook.
A Notebook is the recommended format to use in Notebook Pro. Your new Notebook will be Saved Automatically in the background when any changes are made to it. It is also automatically backed up incase files on your computer get damaged.
From the Home Screen, tap the New button
Next tap the Notebook button
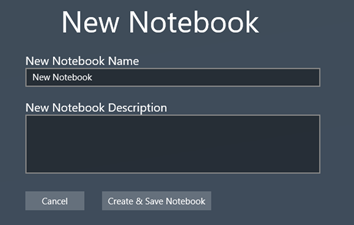
Enter a name for your new Notebook. Then tap on Create and Save Notebook to be prompted on where to Save your new Notebook File on your device.
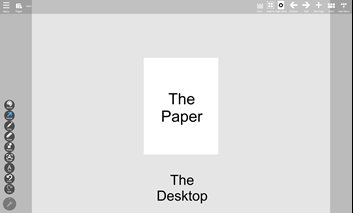
The Paper and the Desktop
In Notebook Pro think of the desktop as your work area and the paper as you finished product. You can draw, write, doodle, add image and text, etc. anywhere on the desktop or paper. You can then move any of the items you create or add anywhere you want.
Page & Paper Setup
The Page & Paper Setup is what type of paper or background your page will have. To access the Page & Paper Setup tap the Page Setup button.

You can choose from many types of paper types such as writing, graph, storyboarding. Or you can choose an image from your device or take a photo and make it the paper.
Creating a new Page in my new Notebook
There are a few ways to create a new page. The easiest is to click the New Page button in the top menu and then choose from one of the 3 choices. Same Paper as Current create a new page with the exact same paper type or background as the current one. Exact copy of Current will create a new page that is an exact copy of the current page along with all its content. Default Page Type will create a page based on the Default Paper Type set in Page Setup with the Set As Default button at the bottom of Page Setup.
The Tools Menu
The tools menu is where you select the tool that you want to work with such as Draw, Erase, Add Text, Images, etc. You can move the tools menu anywhere on the screen so it's out of your way. There is an alternative way to access tools, The Radial Menu, but we'll get to that later as it is a little more advanced.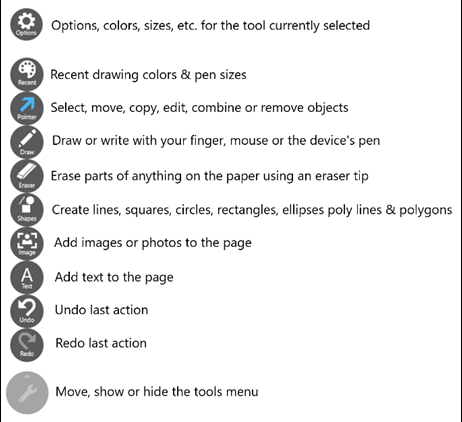
How to Draw, Write & Paint
To draw select the Draw tool from the Tools menu. Choose a color, size, transparency by tapping the Options button. Then draw anywhere with you finger, mouse or the device's pen.
How to Make a Colored Background
If you want to use a colored background, click on Page Setup at the top of the desktop and scroll down to Page Color – here you can choose a page color from the Palettes.
How to Trace, Draw or Meme on an Image or Photo
If you have an image you want to trace it, go to Page Setup and choose the image as the Background. After you have traced the image go back to Page Setup, scroll down to Page Type and select Blank. The background image will disappear and leave just the lines you traced; then you can finish the drawing any way you want it.
How to Use Add Text
Click on the Text mode and the Text Options will appear to the side, click on Options to change the Font Size, the Font Style, the Color and the transparency of the color. Click on the page where you want to start the text and when you have finished typing, click outside the Select Box to apply.
To Edit the Text, select the Text and right click inside the select box, click on Edit Text.
When you click on the text or object on the page the Apply or Cancel prompt will appear on the upper right side and you have the option of using them as well.
Multi-Page Printing, Exporting, Deleting, Copying & Moving
You can print, export, move, copy & delete multiple pages at once from the Pages screen up to all the pages in an entire section at once. Just go to the Sections/Pages screen. Tap and hold or right click on any page and then choose "Select pages...". You are then able to tap on a page to select it. Then you can choose to Print, Export, Move, Copy or Delete the selected pages from the buttons below.
PDF Files
To open a PDF file, go to Menu (top left), click on Home, click on Open, then upload the PDF. You can draw or write on the PDF document or image; if you make a mistake you can erase what you wrote.
How To Convert PDF to Images
Open a PDF document in Notebook Pro with Open on the Home Screen. From the Pages screen select the Multi-page Print, Export, Move, Copy & Delete button. Then tap Select All and next Export. From the Export Pages side screen choose the options and then the folder where you would like the images exported to.
How to Save & Reuse Drawings & Other Objects with Object Boxes
If you make a drawing you can select part or all of the drawing and save it to use later in another drawing. e.g. if you draw a face and you would like to save the eyes to use in a different drawing, select one eye at a time, right click inside the select box, then click on "Save in box". When you draw your next face you can use the same eyes, just drag them in to place on the page.